

An Italian chocolate sponge cake has only four ingredients: eggs, sugar, flour and cocoa powder. Vanilla can be added to enhance the chocolate flavour. The beauty of this cake is that it has no fat, no dairy, and no leavening agents. So how does the cake get it's height? Stiffly beaten egg whites make this cake airy, soft, and spongy. Keep reading to find out how to make this easy recipe.

In Italian, sponge cake is referred to as pan di Spagna or 'Spanish bread'. It is used in traditional Italian desserts, such as Tiramisu and Italian Rum Cake. This chocolate version is a slight variation of the 3-ingredient Italian Sponge Cake recipe, that I found years ago on Food.com, when it was still known as Recipezaar. The recipe has been online since the early 2000's with a 5-star rating, and the owner who submitted the recipe, wrote that it has been in the family for over 50 years. This recipe is a timeless classic that has been tried-and-tested.
The slight variation that I make, is substituting a portion of the flour with cocoa powder. I have made it using unsweetened cocoa powder, which gives the cake a nice chocolatey flavour, and also with Dutch-processed cocoa, which gives it an intense flavour similar to dark chocolate. Either way, the cake is delicious!

What I love most about this recipe is how fluffy and tender the crumb is! It's so light and pillowy, that it springs back beautifully, when you press your finger against it. It's so soft that you could almost sleep on it! :-)

One of the secrets to giving the sponge cake its height, is not greasing the springform pan (similar to an angel food cake). This will allow the batter to stick to the sides of the pan as it expands during baking. If the pan is greased, then the cake will pull away from the sides and sink after it has cools. Here, I lined the bottom of the springform with baking paper (sometimes I reuse it if it looks decent) for easier removal. I didn't bother greasing the bottom of the pan to hold the paper down, either. The paper will stay in its' place and the pan will be easier to clean afterwards.
To begin, trace the bottom springform plate onto baking or parchment paper, cut it out, assemble the form together, and then line the bottom with the cut-out. Set aside.

Next, separate the eggs. Here, I made a tiny mistake. :-) The egg whites go into the large bowl and the egg yolks go into the medium bowl. Later on, the egg yolk mixture will be added to the egg white mixture. Make sure that the eggs are at room temperature.

Beat the egg whites until stiff. Carefully flip/tip the bowl to see if they have been properly beaten. If the egg whites have soft peaks, continue beating for another minute or so. You'll know that they are ready when the stiffened egg whites stay inside the bowl, when flipped over (a nice little trick to do over your kid's head). If you happen to overbeat the egg whites, they will lose their structure, and you'll have to start over again.
Now, slowly sprinkle in half the sugar, while beating on high speed. By adding the sugar, it will stabilize the egg whites, allowing them to keep their form (they won't turn watery at the bottom as you continue with the recipe). For this reason, cream of tartar is not required.
Now, slowly sprinkle in half the sugar, while beating on high speed. By adding the sugar, it will stabilize the egg whites, allowing them to keep their form (they won't turn watery at the bottom as you continue with the recipe). For this reason, cream of tartar is not required.


Add the egg yolk mixture to the egg whites and gently fold until everything is well incorporated. I hold the spatula in place and turn it from the center outwards. With each rotation of the spatula, I also rotate the bowl. Here is an good article on how to fold egg whites into a batter. If you are more of a visual person like I am, then this video from allrecipes.com will be helpful (there's a great tip on how to store egg yolks in the fridge if you don't need them immediately).

The photo above shows the right consistency that the batter should be at. You don't want to overfold the batter, otherwise, it will deflate and the cake won't be as tall (it will have a tighter crumb).

Next, mix the flour and cocoa together. I don't really bother sifting the two together. I find that by simply using a hand whisk, it breaks up any lumps and adds air into the flour mixture. If you would like to sift the two ingredients together, then please do so. :-)

Fold in the flour/cocoa mixture in thirds. For the first and second times, the mixture doesn't need to be folded in perfectly, but with the last amount, it should be well incorporated (see last photo in collage above). Be careful not to overfold.

Transfer batter to prepared springform pan and spread it to the edges. Bake at 350 degrees Fahrenheit (180 degrees Celcius) for 25 minutes, or until a toothpick inserted in the center comes out clean.


The cake will puff up a bit, but will level out as it cools. The original recipe states to bake the cake for 30 minutes, but I find that 25 minutes is enough. By baking it a few minutes less gives the cake it's pillowy soft texture. :-)

You can test the cake to see if it is done, by pressing your finger onto the surface. It should feel soft and it should spring back up. If you're not sure, then insert a toothpick in the center, and if it comes out clean, then it's baked through. If you're interested, here is a great article that I came across on different ways to tell if your cake is done.

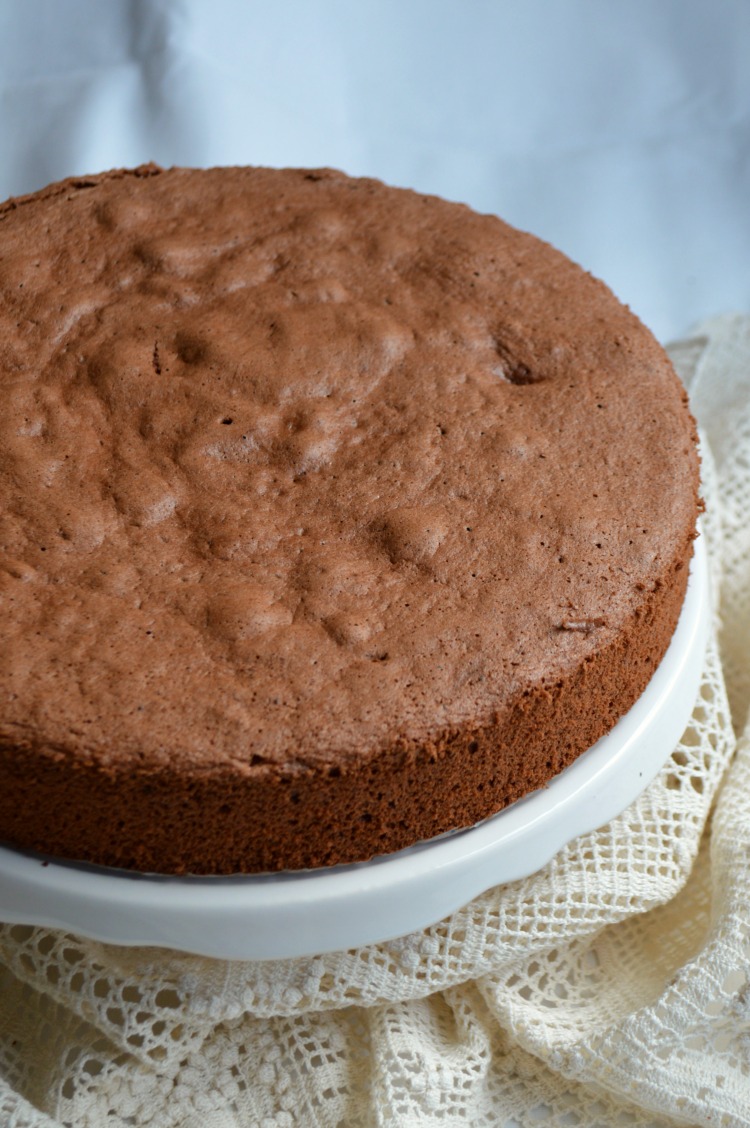
Let the cake cool completely to room temperature before removing it from the pan. The cake will settle a little bit but won't cave in. The cake might tear a little on the side (like mine did), but don't worry if this happens ... it's not a bad thing. :-)

Run a small, sharp knife along the sides of the springform to loosen the cake from the pan. Remove the ring and ....

... ta da! There you have it! A perfect chocolate Italian sponge cake! Feel free to fill and decorate as you please. :-)

If you are not using it immediately, don't leave the cake sitting too long at room temperature, or it will dry out. Place the ring around the cake, cover with aluminium foil, and place it in plastic bag (I always use a clean grocery bag). Store in the refrigerator for a couple of days.

When you cut into the cake, it will be a bit crumbly. Simply brush the crumbs away and continue filling and frosting as desired. You can cut the cake in half or into three layers. If you find it a bit intimidating, then here is a good article and video from Wicked Goodies.

For those who don't know, I am a former cubicle dweller, turned pastry chef (I love what I do). We bake sponge cakes a daily basis and this is the fool-proof method that we always use.

Happy baking!!
CHOCOLATE ITALIAN SPONGE CAKE
(From the Kitchen of For the Love of Italian Cooking)
Ingredients:
- 6 eggs at room temperature, separated
- 1 cup (200 g) granulated sugar, divided
- 7/8 cups (100 g) of cake flour (measure 1 cup of flour and remove 2 levelled tablespoons)
- 6 tbsp (40 g) cocoa powder (Dutch-processed or unsweetened)
- 1 tsp vanilla extract or 1 pkg vanilla sugar (optional)
Instructions:
- Preheat oven to 350 deg F (180 deg C) and line the bottom of a large springform pan with wax or parchment paper.
- In a large mixing bowl, beat egg whites on high speed with an electric hand mixer, until stiff. Then slowly add half the sugar and beat a minute longer.
- In a medium bowl, cream together the egg yolks and sugar until thick, creamy and pale in colour. You can also add the vanilla, if using. Gently fold into the egg white mixture.
- Using a hand whisk, stir together flour and cocoa powder in a smaller bowl, until well combined. If you wish, you can sift the two together. Fold a third of the flour/cocoa mixture into the egg mixture, fold another third, and fold in the remaining third.
- Pour into prepared springform pan and spread batter to the edges.
- Bake for 25-30 minutes, or until a toothpick inserted in the center comes out clean.
- Cool completely in the pan and then run a sharp knife along the sides to loosen up the cake.
- Fill and frost as desired. If not using immediately, then keep the cake in the pan, cover with aluminum foil, put it in a plastic bag, and store in the refrigerator up to several days, until ready to use. The cake can also be frozen.
MAKES 10-12 SERVINGS

It looks perfect! I have to try it next time I make a chocolate cake.
ReplyDeleteHi Adina! Thanks for stopping by. I hope you'll like it. :-)
Delete